936-448-6677

NDT DISCONTINUITIES

Defectology in NDT deals with the defects that affect all the stages of product realization, starting from raw material to finished product. Discontinuities are imperfections in a test object that interfere with the usefulness of the test object. Discontinuities affect the physical properties of the test object and can also affect or hamper the test object’s ability to fulfill the intended purpose and service life.

Discontinuities can be present in a material from the very first stage of its manufacturing if good quality raw materials are not used. when the same material passes through a multiple number of processes shape and size of discontinuities can change.

Non-destructive testing (NDT) is a wide group of analysis techniques used in science and technology industry to evaluate the properties of a material, component or system without causing damage.

To learn more about how NDT began Read our blog:

HISTORY OF NON-DESTRUCTIVE TESTING(NDT)

To learn about need of NDT read our blog:

NEED FOR NON-DESTRUCTIVE TESTING(NDT)

Definitions as per ASME BPVC Sec-V Article 1

  • Defect: one or more flaws whose aggregate size, shape, orientation, location, or properties do not meet specified acceptance criteria and are rejectable.
  • Discontinuity: a lack of continuity or cohesion; an intentional or unintentional interruption in the physical structure or configuration of a material or component.
  • Flaw: an imperfection or discontinuity that may be detectable by nondestructive testing and is not necessarily rejectable.
  • Imperfection: a departure of a quality characteristic from its intended condition.

Discontinuities can be divided into three general categories inherent, processing, and service

  1. Inherent Discontinuities are usually formed when the metal molten solidifies. Inherent wrought discontinuities relate to the melting and solidification of the original ingot before it is formed into slabs, blooms, and billets. Inherent cast discontinuities relate to the melting casting and solidification of a cast article. Usually caused by inherent variables such as inadequate feeding, gating, and excessive pouring temperature and entrapped gasses.
  2. Processing discontinuities are usually related to the various manufacturing processes such as machining, forming, extruding, rolling, welding, heat treatment and plating,
  3. Service discontinuities are related to the various service conditions such as stress, corrosion, fatigue, erosion.


Inherent discontinuities found in the ingot are inclusions, blowholes, pipe, and segregations.

  1. Nonmetallic inclusions such as slag, oxides, and sulfides are present in the original ingot.
  2. Blowholes (pores) are formed by gas which is insoluble in the molten metal and is trapped when the metal solidifies.
  3. Pipe is a discontinuity in the center of the ingot caused by internal shrinkage during solidification.
  4. Segregations occur when the distribution of the various elements is not uniform throughout the ingot. This condition is called banding.
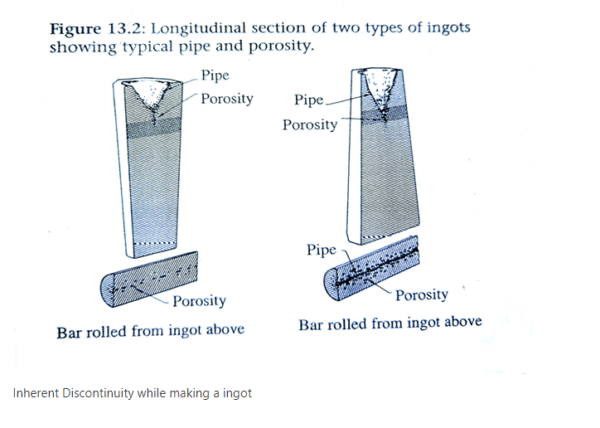
Inherent Discontinuity while making a ingot

Typical inherent discontinuities found in castings

  • Cold Shut: A cold shut is caused when molten metal is poured over solidified metal.
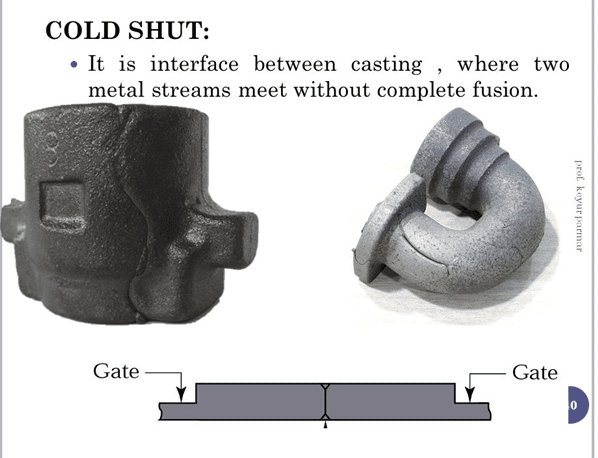
Cold Shut
https://slideplayer.com/slide/5732233/
  • Hot tears (shrinkage cracks) occur when there is unequal shrinkage between light and heavy sections as shown below
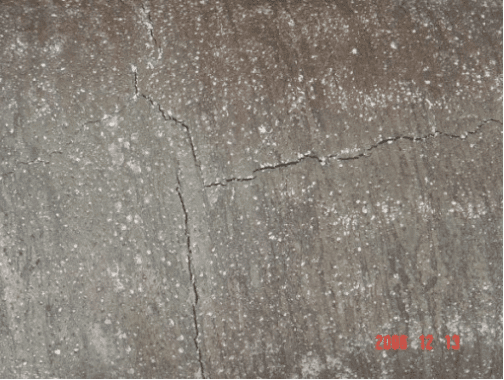
Hot tears in Casting Surface
http://ccmcotulsa.com/visible-defects-hot-tears/
 
  • Shrinkage cavities are usually caused by lacking of enough molten metal to fill the space created by shrinkage, similar to the pipe in the ingot.

Radiograph showing Casting Shrinkage
  • Micro shrinkage is usually many small subsurface holes that appear at the gate of the casting. It can also occur when the molten metal must flow from a thin section into a thicker section of a casting.
  • Blowholes are small holes at the surface of the casting caused by gas which comes from the mold itself many molds are made of sand and when the molten metal comes into contact with the mold the water in the sand is released as steam.
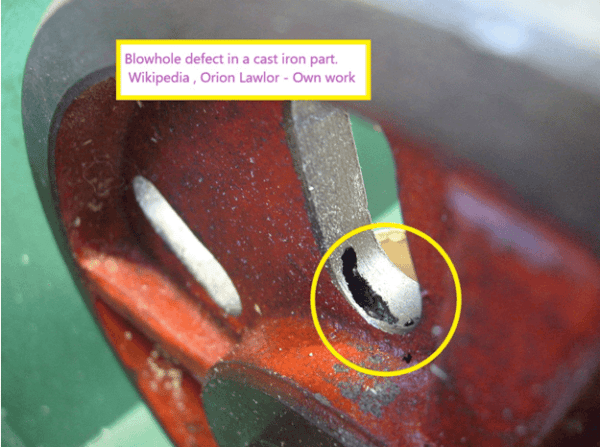
Blow Holes
Wikipedia
  • Porosity is caused by entrapped gas porosity is usually subsurface but can occur on the surface depending on the design of the mold.
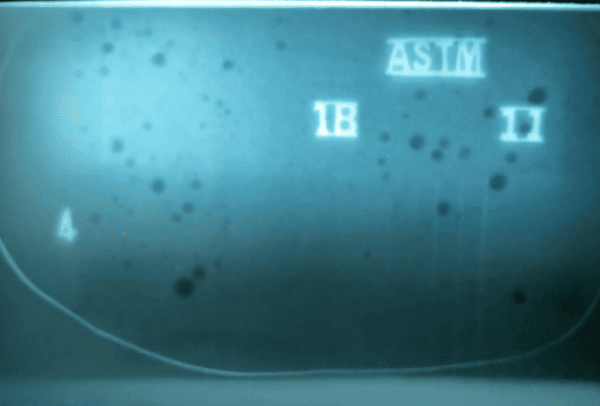
Gas Porosity in castings

Processing discontinuities

Processing discontinuities are those found or produced by the forming or fabrication operations including rolling, forging, welding, machining, grinding, and heat-treating.

When an ingot is further processed into slabs, blooms, and billets, it is possible for the above discontinuities to change size and shape.

Depending on the type of processing and the original type of discontinuity, the discontinuities after rolling and forming are

  • Laminations: when a billet is flattened or spread out, discontinuities like pipe porosity and nonmetallic inclusions may cause a lamination.
  • Stringers: during the rolling process the nonmetallic inclusions are squeezed out into longer and thinner discontinuities called stringers.
  • Seams: surface irregularities can cause seams during the rolling process. They are caused by folding of metal due to improper rolling, a crack in a billet, forming of billets into rectangular bars.
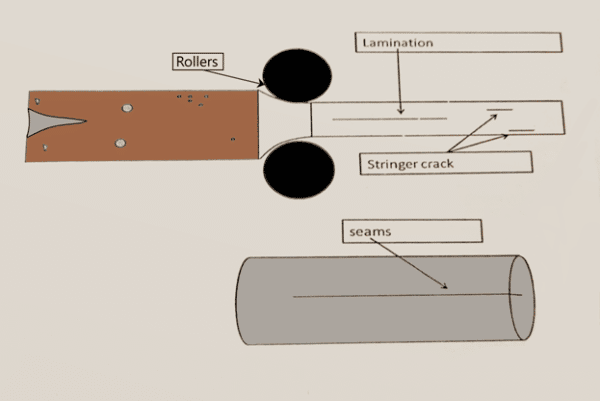
Discontinuities in a rolling Process


Grinding crack is a processing type discontinuity caused by stresses which are built up from excess heat created between a grinding wheel and metal.
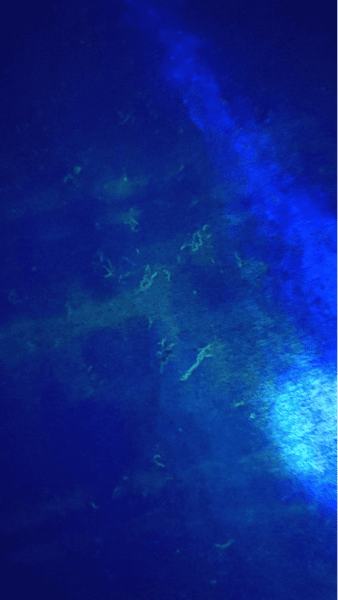
Grinding Cracks visible in Florescent Magnetic Particle Testing

Forging discontinuities occur when metal is hammered or pressed into shape usually while the metal is very hot. Forged part gains strength due to the grain flow taking the shape of the die.

A forging lap is caused by folding of the metal on the surface of the forging usually when some of the forging metal is squeezed out between the two dies.
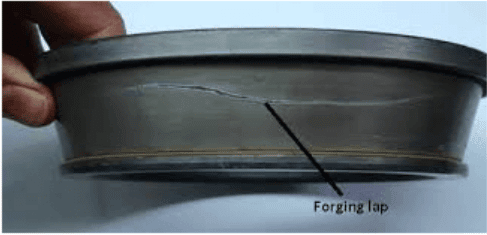
Forging Lap
PC: Anveshan, IIT BHU Varanasi


forging burst is a rupture caused by forging at improper temperatures bursts that may be either internal or open to the surface.
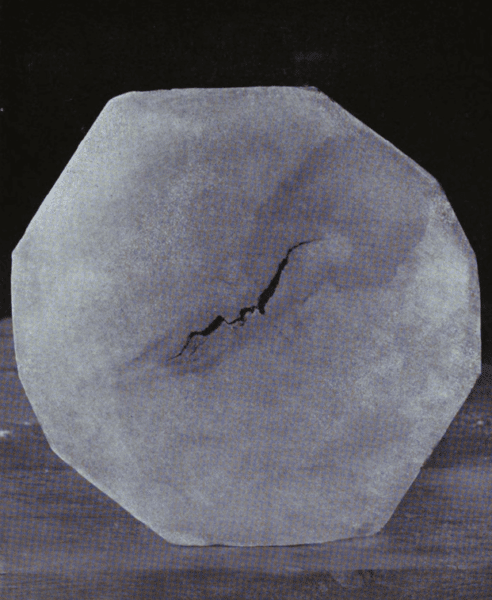


Welding Discontinuities:

Cold cracking (under bead or delayed cracking): cold cracking is a form of hydrogen-induced cracking that appears in the heat-affected zone or weld metal of low alloy and hardenable carbon steels. The principle factors contributing to cold cracking are the presence of atomic hydrogen. Sources of atomic hydrogen include moisture in the electrode covering, shielding gas or base metal surface as well as contamination of the filler or base metal by a hydrocarbon (oil or grease)

Hot cracking:  occurs at elevated temperatures.

Solidification cracking: it occurs near the solidification temperature of the weld metal and is caused by the presence of low melting point constituents typically iron sulfides that segregate to the weld metal dendrite surfaces during the liquid – to – solid transformation processes.
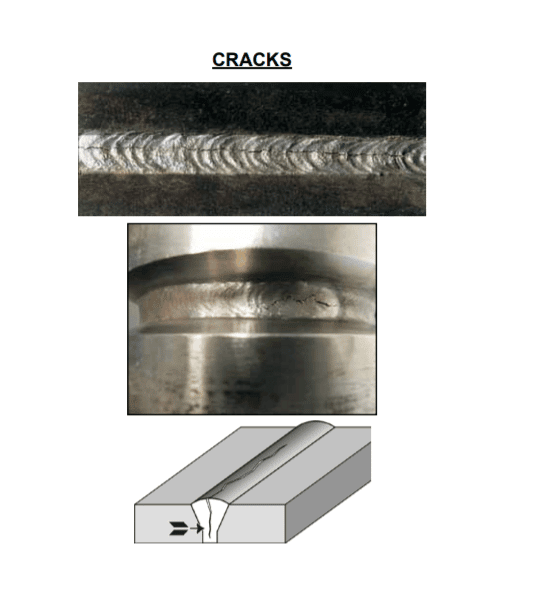
Weld Cracks
Welders_Visual_Inspection_Handbook-2013_WEB.pdf

Centreline hot crack is a crack seen following the longitudinal centerline of the deposited weld bead and crater crack occurs in the crater formed at the termination of a weld pass are frequently observed type of solidification cracking.
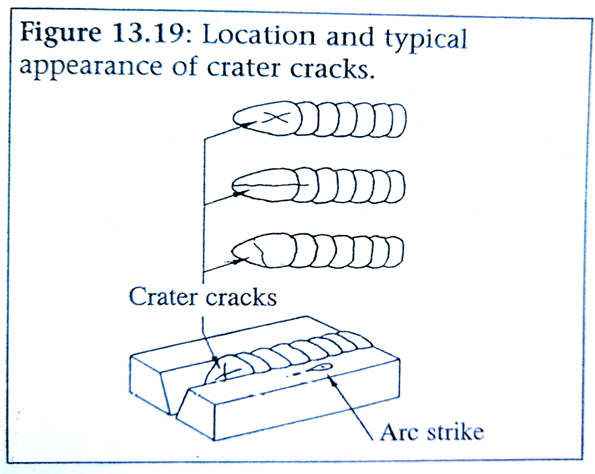
Crater Cracks in Welds

Liquation cracking or hot tearing occurs in the heat-affected zone of a weld when the temperature in that region results in the results liquation of low melting points constituents.

Lamellar tearing: a lamellar tearing is a base metal crack that occurs in plates and shapes of rolled steel exhibiting high nonmetallic inclusion content. These inclusions are rolled flat in the steel plate manufacturing process, severely reducing strength and ductility in the through-thickness direction.  When the shrinkage stresses induced by weld solidification are imposed in that direction on the base metal plate, separation of the metal at the flattened inclusions might occur, as may shearing between those lamellar planes resulting in a terraced fracture. It can be readily detectable by magnetic particle testing.

Lamellar Tearing

Lack of Fusion/ Incomplete Fusion: Lack of fusion occurs when some portion of the weld filler metal fails to coalesce with the adjacent base metal or the weld metal from a previous pass. In welding processes that use no filler metal, lack of fusion refers to complete coalescence between the two base metal components being joined.
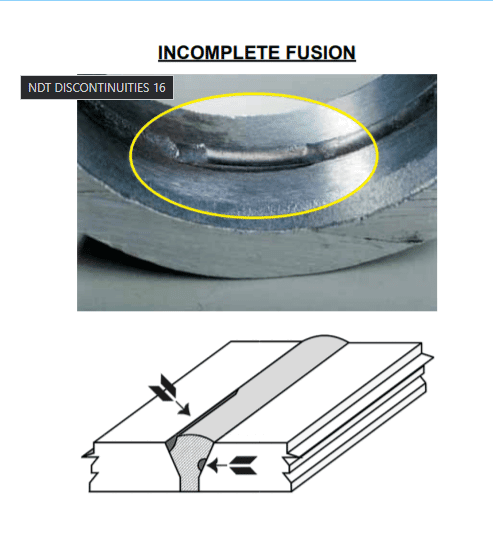
Lack of fusion / Incomplete Fusion in weld
Welders_Visual_Inspection_Handbook-2013_WEB.pdf

Lack of penetration / Incomplete penetration: it is inadequate penetration of the weld joint root by the weld metal. The condition can result from a number of incorrect parameters like low amperage, using oversized electrode, improper arc manipulation, and inadequate pre weld cleaning.
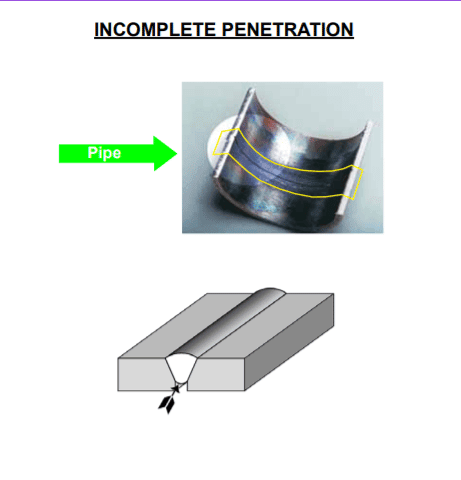
Lack of Penetration / Incomplete penetration
Welders_Visual_Inspection_Handbook-2013_WEB.pdf

Porosity: Porosity is composed of cavities or pores that form when some constituent within the molten weld metal vaporizes and forms a small pocket of gas that is entrapped when the weld solidifies. The pores can take a variety of shapes and sizes although they are usually spherical. However, one type of elongated pore is often called elongated porosity. The distribution of porosity within the weld metal may be clustered or linear.
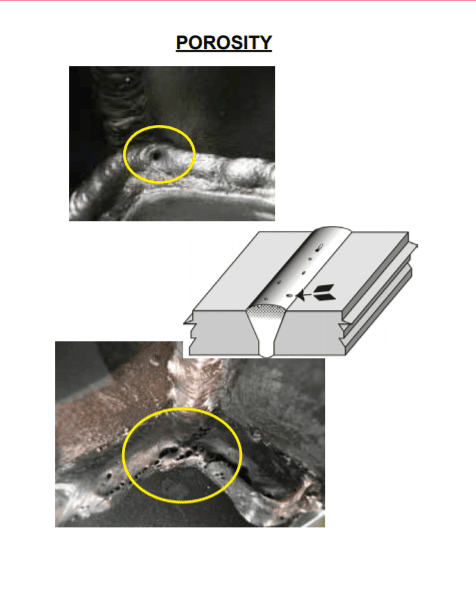
Weld Porosity
Welders_Visual_Inspection_Handbook-2013_WEB.pdf

Slag Inclusions: Many weld processes use flux shielding, including shielded metal arc welding (SMAW), submerged arc welding (SAW), and flux-cored arc welding (FCAW). Welds produced by these methods are particularly susceptible to discontinuities known as slag inclusions. Slag is entrapped in the weld metal during solidification if it is unable to float out while the pool is still liquid.
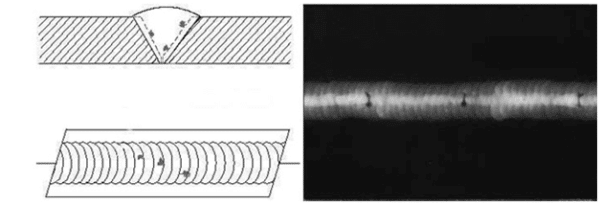
Slag Inclusions : Radiographic Image

Tungsten inclusions are found in the weld metal deposited by the gas tungsten arc welding (GTAW) process and are usually the result of the molten weld pool or the filler metal to come in contact with the tip of the tungsten electrode.
Tungsten Inclusion : Radiographic Image

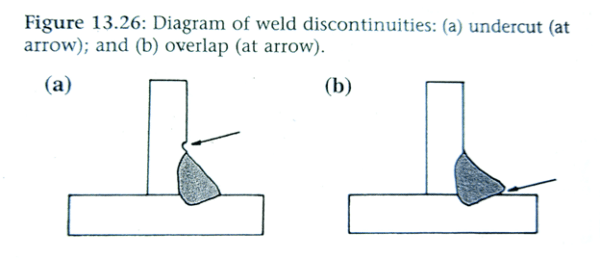
Undercut:  undercut occurs at the toe of a weld when the base metal thickness is reduced. Essentially a narrow crevice is formed in the base metal, paralleling the weld toe and immediately adjacent to it. It lessens joint strength in the static sense by reducing the base metal section thickness. Also creates a stress concentration that reduces the impact, fatigue, and low-temperature properties of the joint.
Under and Overlap in welds

Overlap: overlap is the protrusion of weld metal over the weld toe, producing a form of the lack of fusion that creates a sharp mechanical notch or stress concentration.

Service Discontinuities:

When we manufacture a product making sure it is free from any defect doesn’t mean that the product will last till eternity. Everything has its service life. A product’s service life is its period of use in service.  The life expectancy of a component is dependent on its service environment both chemical and mechanical, the quality on its maintenance, and the appropriateness of its design.

Articles which may develop defects due to metal fatigue are considered extremely critical and demand close attention.

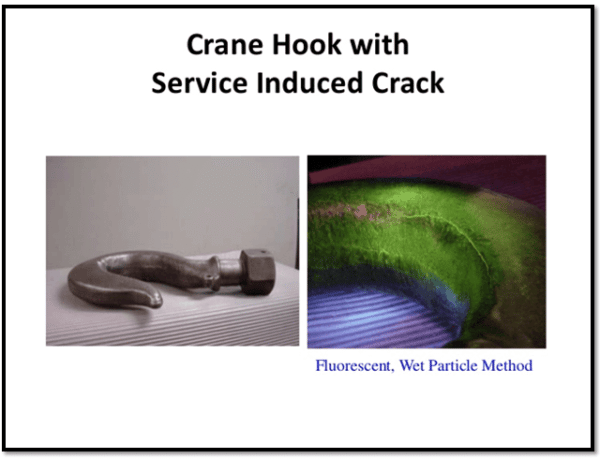
Fatigue cracks are service type discontinuities that are usually open to the surface where they start from stress concentration points. Fatigue cracks are possible only after the part is placed into service but may be the result of porosity, inclusions, or other discontinuities in a highly stresses metal part.
Fatigue Cracks in a crane hook visible in magnetic particle testing
PC:Hareesha N Gowda, Dayananda Sagar College of Engg, Bangalore – Slideshare

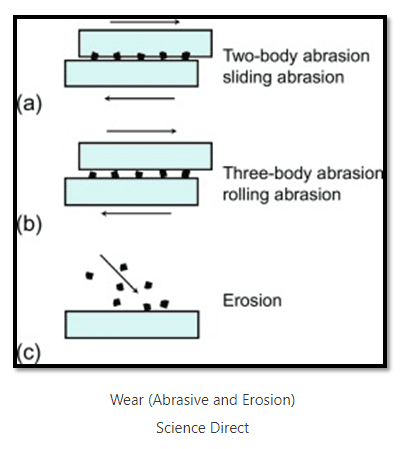
Abrasive wear occurs when a certain material scratches or gouges a softer surface. It has been estimated that abrasion is responsible for 50% of all wear-related failures. A typical example of abrasive wear is the damage of crankshaft journals in reciprocating compressors. Hard dirt particles will break through the lubricant film and cut or scratch the journal’s comparatively softer surface. Wear, or the undesired removal of material from rubbing surfaces, causes many surface failures.
Wear (Abrasive and Erosion)
Science Direct

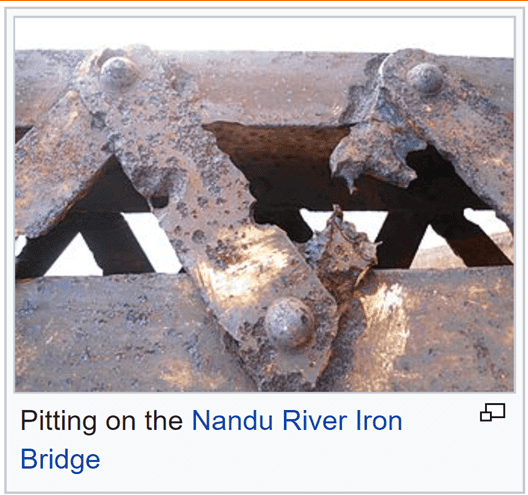
Corrosion is a natural process that converts a refined metal into a more chemically stable form such as oxide, hydroxide, or sulfide. It is the gradual destruction of materials by chemical and/or electrochemical reaction with their environment. Corrosion failure is a material failure related to corrosion. Studies of failure analysis are particularly useful in the chemical processing, refining, oil & gas, and pulp & paper industries.
Corrosion and pitting on a metal bridge

Pitting corrosion, or pitting, is a form of extremely localized corrosion that leads to the creation of small holes in the metal. The driving power for pitting corrosion is the depassivation of a small area, which becomes anodic while an unknown but potentially vast area becomes cathodic, leading to very localized galvanic corrosion. The corrosion penetrates the mass of the metal, with a limited diffusion of ions.

Creep: In materials science, creep (sometimes called cold flow) is the tendency of a solid material to move slowly or deform permanently under the influence of persistent mechanical stresses. It can occur as a result of long-term exposure to high levels of stress that are still below the yield strength of the material. Creep is more severe in materials that are subjected to heat for long periods and generally increases as they near their melting point.

Erosive wear (or erosion) occurs when particles in a fluid or other carrier slide and roll at relatively high velocity against a surface. Individually, each particle removed is insignificant, but a large number of particles removed over a long period of time can produce staggering degrees of erosion.


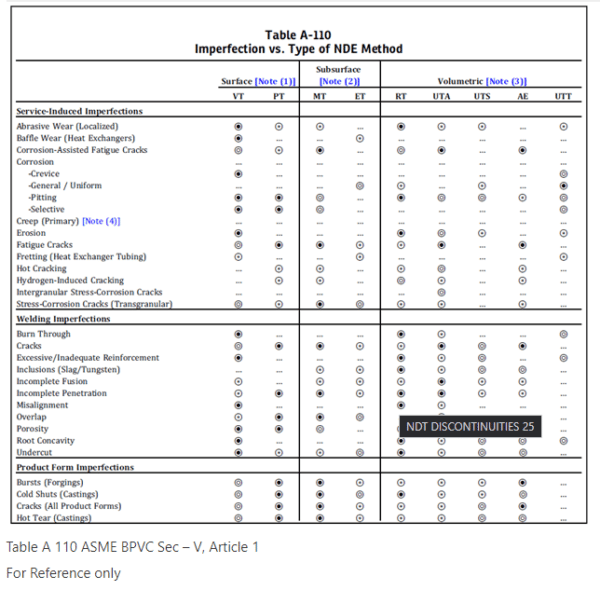
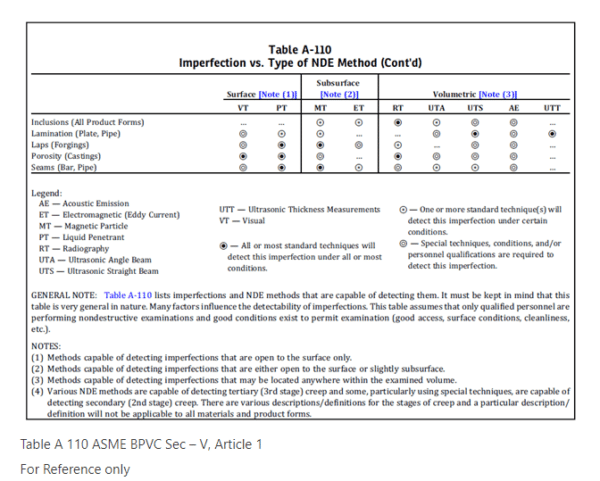
Table A-110  of ASME BPVC Sec-V, Article 1 lists common imperfections and the NDE methods that are generally capable of detecting them.

CAUTION: Table A-110 should be regarded for general guidance only and not as a basis for requiring or prohibiting a particular type of NDE method for a specific application. For example, material and product form are factors that could result in differences from the degree of effectiveness implied in the table. For service-induced imperfections, accessibility and other conditions at the examination location are also significant factors that must be considered in selecting a particular NDE method.

In addition, Table A-110 must not be considered to be all-inclusive; there are several NDE  methods/techniques and imperfections not listed in the table. The user must consider all applicable conditions when selecting NDE methods for a specific application.
Disclaimer

We have tried to cover basic types of discontinuities in the general processes. However, there are more discontinuities process-specific and code specific which we have not covered in this article. we will try to cover them in our coming articles.

References :

  • PTP Classroom Training Books.
  • ASNT  RT Lecture Guide.
  • ASME BPVC Sec-V
  • Wikipedia
  • Science direct
  • Welders_Visual_Inspection_Handbook-2013_WEB.pdf
  • Slide Share
  • Erosive wear – Tec Eurolabwww.tec-eurolab.com

Magnetization Techniques in MT

Magnetic particle testing is used to detect surface and shallow subsurface discontinuities such as cracks, laps, seams, cold shuts, and laminations in ferromagnetic materials (no other type of material) such as iron, nickel, cobalt, and some of their alloys.

Magnetization Techniques in MT

In principle, this method involves magnetizing an area to be examined and applying ferromagnetic particles (the examination’s medium) to the surface. Particle patterns form on the surface where the magnetic field is forced out of the part and over discontinuities to cause a leakage field (magnetic flux leakage) that attracts the particles. Particle patterns are usually characteristic of the type of discontinuity that is detected. There are multiple magnetization techniques for performing magnetic particle testing however whichever technique is used to produce the magnetic flux in the part, maximum sensitivity will be to linear discontinuities oriented perpendicular to the lines of flux. For optimum effectiveness in detecting all types of discontinuities, each area is to be examined at least twice, with the lines of flux during one examination being approximately perpendicular to the lines of flux during the other. In this article, we will learn about different techniques of magnetization to perform magnetic particle testing.

MAGNETIZATION TECHNIQUES

One or more of the following five magnetization techniques shall be used:

  • (a) prod technique
  • (b) longitudinal magnetization technique
  • (c) circular magnetization technique
  • (d) yoke technique
  • (e) multidirectional magnetization technique

PROD TECHNIQUE

Magnetizing Procedure.

For the prod technique, magnetization is accomplished by portable prod type electrical contacts pressed against the surface in the area to be examined. To avoid arcing, a remote control switch, which may be built into the prod handles, shall be provided to permit the current to be applied after the prods have been properly positioned.

Magnetizing Current.

Direct or rectified magnetizing current shall be used. The current shall be 1 0 0 ( minimum ) amp / in . ( 4 amp/mm) to 125 (maximum) amp/in. (5 amp/mm) of prod spacing for sections 3/4 in. (19 mm) thick or greater. For sections, less than 3/4 in. (19 mm) thick, the current shall be90 amp/in. ( 3 . 6 amp/mm) to 110 amp/in. (4.4 amp/mm) of prod spacing.

Prod Spacing.

Prod spacing shall not exceed 8 in. (200 mm). Shorter spacing may be used to accommodate the geometric limitations of the area being examined or to increase the sensitivity, but prod spacing’s of less than 3 in. (75 mm) are usually not practical due to banding of the particles around the prods. The prod tips shall be kept clean and dressed. If the open-circuit voltage of the magnetizing current source is greater than 25 V, lead, steel, or aluminum (rather than copper) tipped prods are recommended to avoid copper deposits on the part being examined.


LONGITUDINAL MAGNETIZATION TECHNIQUE

Magnetizing Procedure.

For this technique, magnetization is accomplished by passing a current through a multi-turn fixed coil (or cables) that is wrapped around the part or section of the part to be examined. This produces a longitudinal magnetic field parallel to the axis of the coil. If a fixed, prewound coil is used, the part shall be placed near the side of the coil during the inspection. This is of special importance when the coil opening is more than 10 times the cross-sectional area of the part.

Magnetic Field Strength.

Direct or rectified current shall be used to magnetize parts examined by this technique. The required field strength shall be calculated based on the length and the diameter of the part in accordance with (a) and (b), or as established in (d) and (e), below. Long parts shall be examined in sections not to exceed 18 in. (450 mm), and 18 in. (450 mm) shall be used for the part in calculating the required field strength. For noncylindrical parts, shall be the maximum cross-sectional diagonal.

(a) Parts With L/D Ratios Equal to or Greater Than 4.

The magnetizing current shall be within 10% of the ampere-turns value determined as follows:

(b) Parts With L/D Ratios Less Than 4 but Not Less Than 2.

The magnetizing ampere-turns shall be within 10% of the ampere-turns value determined as follows:

Parts With L/D Ratios Less Than 2. Coil magnetization technique cannot be used.

(d) If the area to be magnetized extends beyond 9 in. (225 mm) on either side of the coils center, field adequacy shall be demonstrated using a magnetic field indicator or artificial flaw shims per ASME BPVC SEC-V, ARTICLE 7 T-764.

(e) For large parts due to size and shape, the magnetizing current shall be 1200 ampere-turns to 4500 ampere-turns. The field adequacy shall be demonstrated using artificial flaw shims or a pie-shaped magnetic field indicator in accordance with ASME BPVC SEC-V, ARTICLE 7 T-764. A Hall-Effect probe gaussmeter shall not be used with encircling coil magnetization techniques.

 Magnetizing Current.

The current required to obtain the necessary magnetizing field strength shall be determined by dividing the ampere-turns obtained in steps (a) or (b) by the number of turns in the coil as follows:

CIRCULAR MAGNETIZATION TECHNIQUE

 Direct Contact Technique.

(a) Magnetizing Procedure.

For this technique, magnetization is accomplished by passing current through the part to be examined. This produces a circular magnetic field that is approximately perpendicular to the direction of current flow in the part.

(b) Magnetizing Current.

Direct or rectified (half-wave rectified or full-wave rectified) magnetizing current shall be used.

  1. The current shall be 300 amp/in. (12 A/mm) to 800 amp/in. (31 A/mm) of outer diameter.
  2. For parts with geometric shapes other than round, the greatest cross-sectional diagonal in a plane at right angles to the current flow shall be used in lieu of the outer diameter in (1) above.
  3. If the current levels required for (1) cannot be obtained, the maximum current obtainable shall be used and the field adequacy shall be demonstrated in accordance with ASME BPVC SEC-V, ARTICLE 7 T-764.

Central Conductor Technique.

PC: ASNT MAGNETIC PARTICLE TESTING CLASSROOM TRAINING BOOK.

(a) Magnetizing Procedure.

For this technique, a central conductor is used to examine the internal surfaces of cylindrical or ring-shaped parts. The central conductor technique may also be used for examining the outside surfaces of these shapes. Where large-diameter cylinders are to be examined, the conductor shall be positioned close to the internal surface of the cylinder. When the conductor is not centered, the circumference of the cylinder shall be examined in increments. Field strength measurements in accordance with ASME BPVC SEC-V, ARTICLE 7  T-764 shall be used, to determine the extent of the arc that may be examined for each conductor position, or the rules in (c) below may be followed. Bars or cables passed through the bore of a cylinder, may be used to induce circular magnetization.

PC: ASME BPVC SEC-V ARTICLE 7

(b) Magnetizing Current.

The field strength required shall be equal to that determined in direct contact circular magnetization (b) for a single-turn central conductor. The magnetic field will increase in proportion to the number of times the central conductor cable passes through a hollow part. For example, if 6000 A are required to examine a part using a single pass central conductor, then 3000 A are required when 2 passes of the through-cable are used, and 1200 A are required if 5 passes are used (see Figure T-754.2.1). When the central conductor technique is used, magnetic field adequacy shall be verified using a magnetic particle field indicator in accordance with ASME BPVC SEC-V, ARTICLE 7   T-764.

(c) Offset Central Conductor.

When the conductor passing through the inside of the part is placed against an inside wall of the part, the current levels, as given in direct contact circular magnetization (b)(1) shall apply, except that the diameter used for current calculations shall be the sum of the diameter of the central conductor and twice the wall thickness. The distance along the part circumference (exterior) that is effectively magnetized shall be taken as four times the diameter of the central conductor, as illustrated in Figure T-754.2.2. The entire circumference shall be inspected by rotating the part on the conductor, allowing for approximately a 10% magnetic field overlap.

PC: ASME BPVC SEC-V ARTICLE 7

YOKE TECHNIQUE

PC: ASNT MAGNETIC PARTICLE TESTING CLASSROOM TRAINING BOOK.

For this technique, alternating or direct current electromagnetic yokes, or permanent magnet yokes, shall be used.  A longitudinal magnetic field can be induced in a test object or in a limited area of a test object by using a handheld yoke. A yoke is a U-shaped piece of soft magnetic material either solid or laminated around which is wound a coil carrying the magnetization current.

MULTIDIRECTIONAL MAGNETIZATION TECHNIQUE

Responsible for this video: Prof. Dr.-Ing. Rainer Schwab, Hochschule Karlsruhe (Karlsruhe University of Applied Sciences), Germany

Magnetizing Procedure.

For this technique, magnetization is accomplished by high amperage power packs operating as many as three circuits that are energized one at a time in rapid succession. The effect of these rapidly alternating magnetizing currents is to produce an overall magnetization of the part in multiple directions. Circular or longitudinal magnetic fields may be generated in any combination using the various techniques described in longitudinal and circular magnetization techniques mentioned above.

Magnetic Field Strength.

Only three phase, full-wave rectified current shall be used to magnetize the part. The adequacy of the magnetic field shall be demonstrated using artificial flaw shims or a pie-shaped magnetic particle field indicator in accordance with BPVC SEC-V, ARTICLE 7  T-764. A Hall-Effect probe gaussmeter shall not be used to measure field adequacy for the multidirectional magnetization technique. An adequate field shall be obtained in at least two nearly perpendicular directions, and the field intensities shall be balanced so that a strong field in one direction does not overwhelm the field in the other direction. For areas where adequate field strengths cannot be demonstrated, additional magnetic particle techniques shall be used to obtain the required two-directional coverage.

REFERENCES:

  • ASNT MAGNETIC PARTICLE TESTING CLASSROOM TRAINING BOOK.
  • ASME BPVC SEC-V ARTICLE 7

Phased Array Ultrasonic Testing – PAUT

UT – Ultrasonic testing is used to test a variety of both metallic and nonmetallic products, such as welds, forgings, castings, sheets, tubing, plastics (both fiber-reinforced and unreinforced), and ceramics. Ultrasonic testing is capable of revealing the subsurface discontinuities in a variety of dissimilar materials, hence it is one of the most effective tools available to quality assurance personal. Conventional ultrasonic transducers for NDT commonly consist of either a single active element that both generates and receives high- frequency sound waves, or two paired elements, one for transmitting and one for receiving. Phased Array Ultrasonic Testing (PAUT) is an advanced ultrasonic technique that permits the shaping and steering of the ultrasonic beam angles, dynamic depth focusing and enhanced beam coverages.  The Phased Array beam sweeps like a searchlight through the object, resulting in a recordable image that reveals defects hidden inside a structure or weld;

To learn more about conventional Ultrasonic testing read our Blog :Phased Array Ultrasonic Testing – PAUT

Introduction to Ultrasonic Testing(UT)

Basic Functional Controls of a UFD


What Is a Phased Array System?

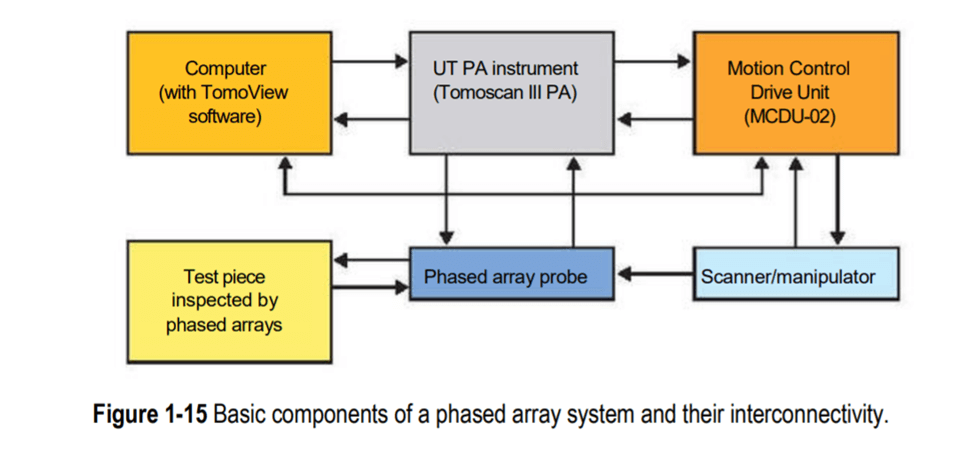
Phased array probes typically consist of a transducer assembly with 16 to as many as 256 small individual elements that can each be pulsed separately . These can be arranged in a strip (linear array), 2D matrix, a ring (annular array), a circular matrix (circular array), or a more complex shape. As is the case with conventional transducers, phased array probes can be designed for direct contact use, as part of an angle beam assembly with a wedge, or for immersion use with sound coupling through a water path.

Transducer frequencies are most commonly in the 2 MHz to 10 MHz range. A phased array system also includes a sophisticated computer-based instrument that is capable of driving the multielement probe, receiving and digitizing the returning echoes, and plotting that echo information in various standard formats.

Unlike conventional flaw detectors, phased array systems can sweep a sound beam through a range of refracted angles or along a linear path, or dynamically focus at a number of different depths, thus increasing both flexibility and capability in inspection setups.

How Does Ultrasonic Phasing Work?

In the most basic sense, a phased array system utilizes the wave physics principle of phasing. It varies the time between a series of outgoing ultrasonic pulses in such a way that the individual wavefronts generated by each element in the array combine with each other. This action adds or cancels energy in predictable ways that effectively steer and shape the sound beam. This is accomplished by pulsing the individual probe elements at slightly different times.

The main feature of phased array ultrasonic technology is the computer controlled excitation (amplitude and delay) of individual elements in a multielement probe.

The excitation of piezocomposite elements can generate an ultrasonic focused beam with the possibility of modifying the beamparameters such as angle, focal distance, and focal spot size through software. The sweeping beam is focused and can detect in specular mode the misoriented cracks. These cracks may be located randomly away from the beam axis.

There are three major computer-controlled beam scanning patterns

• Electronic scanning: the same focal law and delay is multiplexed across a group of active elements ; scanning is performed at a constant angle and along the phased array probe length (aperture). This is equivalent to a conventional ultrasonic transducer performing a raster scan for corrosion mapping or shear wave inspection. If an angled wedge is used, the focal laws compensate for different time delays inside the wedge.

• Dynamic depth focusing, or DDF (along the beam axis): scanning is performed with different focal depths. In practice, a single transmitted focused pulse is used, and refocusing is performed on reception for all programmed depths.

• Sectorial scanning (also called azimuthal or angular scanning): the beam is moved through a sweep range for a specific focal depth, using the same elements; other sweep ranges with different focal depths may be added. The angular sectors may have different values.

Basic Components of a Phased Array System

Phased array probes are functionally categorized according to the following basic parameters:

  • Type – Most phased array probes are of the angle beam type, designed for use with either a plastic wedge or a straight plastic shoe (zero- degree wedge), or delay line. Direct contact and immersion probes are also available.
  • Frequency – Most ultrasonic flaw detection is done between 2 MHz and 10 MHz, so most phased array probes fall within that range.
  • Number of elements – Phased array probes most commonly have 16 to 128 elements, with some having as many as 256.
  • Size of elements – As the element width gets smaller, beam steering capability increases, but large area coverage requires more elements at a higher cost.

Phases Array Probe Cross section

Phased Array Wedges

Phased array probe assemblies usually include a plastic wedge. Wedges are used in both shear wave and longitudinal wave applications, including straight beam linear scans. These wedges perform basically the same function in phased array systems as in conventional single element flaw detection, coupling sound energy from the probe to the test piece in such a way that it mode converts and/or refracts at a desired angle in accordance with Snell’s law. While PAUT systems do utilize beam steering to create beams at multiple angles from a single wedge, this refraction effect is also part of the beam generation process. Shear wave wedges look very similar to those used with conventional transducers, and like conventional wedges they come in many sizes and styles. Some of them incorporate couplant feed holes for scanning applications. Some typical phased array probe wedges are seen in Figure 2-45.

Phased Array Probe Wedges

Basics of PAUT Imaging

Phased array instruments, on the other hand, are naturally multichannel as they need to provide excitation patterns (focal laws) to probes with 16 to as many as 256 elements. Unlike conventional flaw detectors, phased array systems can sweep a sound beam from one probe through a range of refracted angles, along a linear path, or dynamically focus at a number of different depths, thus increasing both flexibility and capability in inspection setups. This added ability to generate multiple sound paths within one probe, adds a powerful advantage in detection and naturally adds the ability to “visualize” an inspection by creating an image of the inspection zone. Phased array imaging provides the user with the ability to see relative point-to-point changes and multiangular defect responses, which can assist in flaw discrimination and sizing. While this can seem inherently complex, it can actually simplify expanding inspection coverage with increased detection by eliminating the complex fixtures and multiple transducers that are often required with conventional UT inspection methods.

The following sections further explain the basic formats for conventional and phased array data presentation.

  • A-Scan Data
  • Single Value B-Scans
  • Cross-sectional B-Scans
  • Linear Scans
  • C-Scans
  • S-Scans
  • Combined Image Formats
  • Scanning Patterns

Reliable defect detection and sizing is based on scan patterns and specific functional combinations between the scanner and the phased array beam. The inspection may be:

  • automated: the probe carrier is moved by a motor-controlled drive unit;
  • semiautomated: the probe carrier is moved by hand, but the movement is encoded; or
  • manual (or free running): the phased array probe is moved by hand and data are saved based on acquisition time(s).

Phased Array Instrumentation

  • Pulser and receiver Parameters that largely define the operating range of transducers that can be used with the instrument
  • Measurement and display
  • Sizing options
  • Inputs and outputs

Advantages of Phased Array as Compared with Conventional UT

Ultrasonic phased array systems can potentially be employed in almost any test where conventional ultrasonic flaw detectors have traditionally been used.

  • Weld inspection and crack detection are the most important applications, and these tests are done across a wide range of industries including aerospace, power generation, petrochemical, metal billet and tubular goods suppliers, pipeline construction and maintenance, structural metals, and general manufacturing. Phased arrays can also be effectively used to profile remaining wall thickness in corrosion survey applications.
  • The benefits of phased array technology over conventional UT come from its ability to use multiple elements to steer, focus, and scan beams with a single probe assembly.
  • The potential disadvantages of phased array systems are a somewhat higher cost and a requirement for operator training. However, these costs are frequently offset by their greater flexibility and a reduction in the time needed to perform a given inspection.
  • An array is an organized arrangement of large quantities of an object. The simplest form of an ultrasonic array for NDT would be a series of several single element transducers arranged in such a way as to increase inspection coverage and/or the speed of a particular inspection.
  • Examples of this include: Tube inspection, where multiple probes are often used for both crack detection, finding laminar flaws, and overall thickness measurement.
  • Forged metal parts, which often require multiple probes focused at different depths to enable the detection of small defects in a zonal manner.
  • A linear arrangement of probes along a surface to increase detection of laminar flaws in composites or corrosion in metals.
Turbine Blade PAUT

References:

  • PHASED ARRAY ULTRASONIC TESTING OF WELDS by NDT INTERNATIONAL PRIVATE LIMITED.
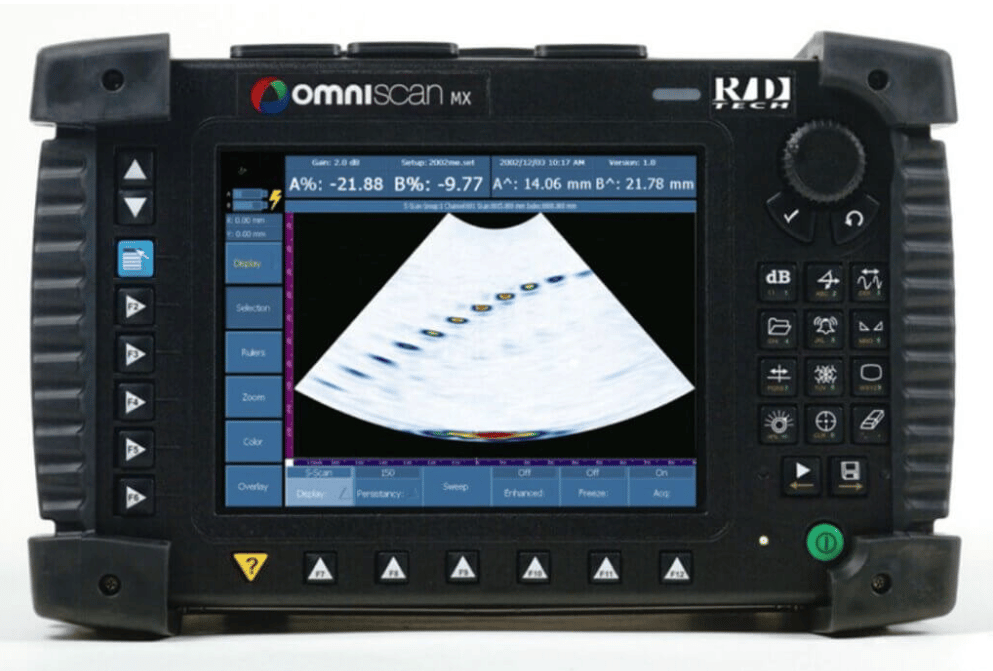
  • Feature Image : Olympus Omni-Scan

    Ultrasonic test to detect imperfection or defect of steel plate in the factory, NDT Inspection.